Interface Overview
LazPaint features a hybrid single window interface / multi-window interface with a main drawing canvas. The toolbox, color picker and layer stack can be separated as floating panels. Each of these panels can be toggled from the View menu (or by pressing F6 to show/hide all tool windows at once). A dark theme for the interface is available if you prefer a darker UI. Menu options are laid out similarly to other image editors (with menus like File, Edit, Select, View, Image, Colors, Tools, Filter, Render, Script, Help along the top). Common actions are also accessible via a toolbar of icons. At the bottom, a status bar displays hints (for example, it shows tool usage tips or selection dimensions). Overall, the interface is designed to be familiar and easy to navigate for beginners.
Basic Tools
LazPaint provides a variety of drawing and editing tools, accessible from the vertical toolbox (usually on the left side of the screen). Below is an overview of the basic tools and their usage:
- Brush/Pen Tool: This freehand drawing tool lets you paint on the canvas with the selected color. You can choose the brush shape and size (even load custom brush images). The brush can have softness (opacity gradient) for smooth edges. Use it to draw lines or any strokes.
- Eraser Tool: Erases parts of the image. The eraser will make pixels transparent (showing a checkerboard background). LazPaint’s eraser can operate in different modes (e.g. you can set it to lighten or darken instead of fully erasing, for special blending effects). Adjust the eraser size and opacity as needed. This is useful for removing unwanted areas or softly blending edges.
- Fill Tool (Bucket): Fills a contiguous area with the current foreground color. Click on a region and the tool will replace that region’s color (within a tolerance) with the selected fill color. It’s great for coloring in shapes or backgrounds. You can adjust the tolerance setting to control how similar neighboring pixels must be to get filled (higher tolerance fills a broader range of colors). Progressive mode can be toggled in the toolbar: when enabled the shape color will be affected as its color becomes different from the initial point.
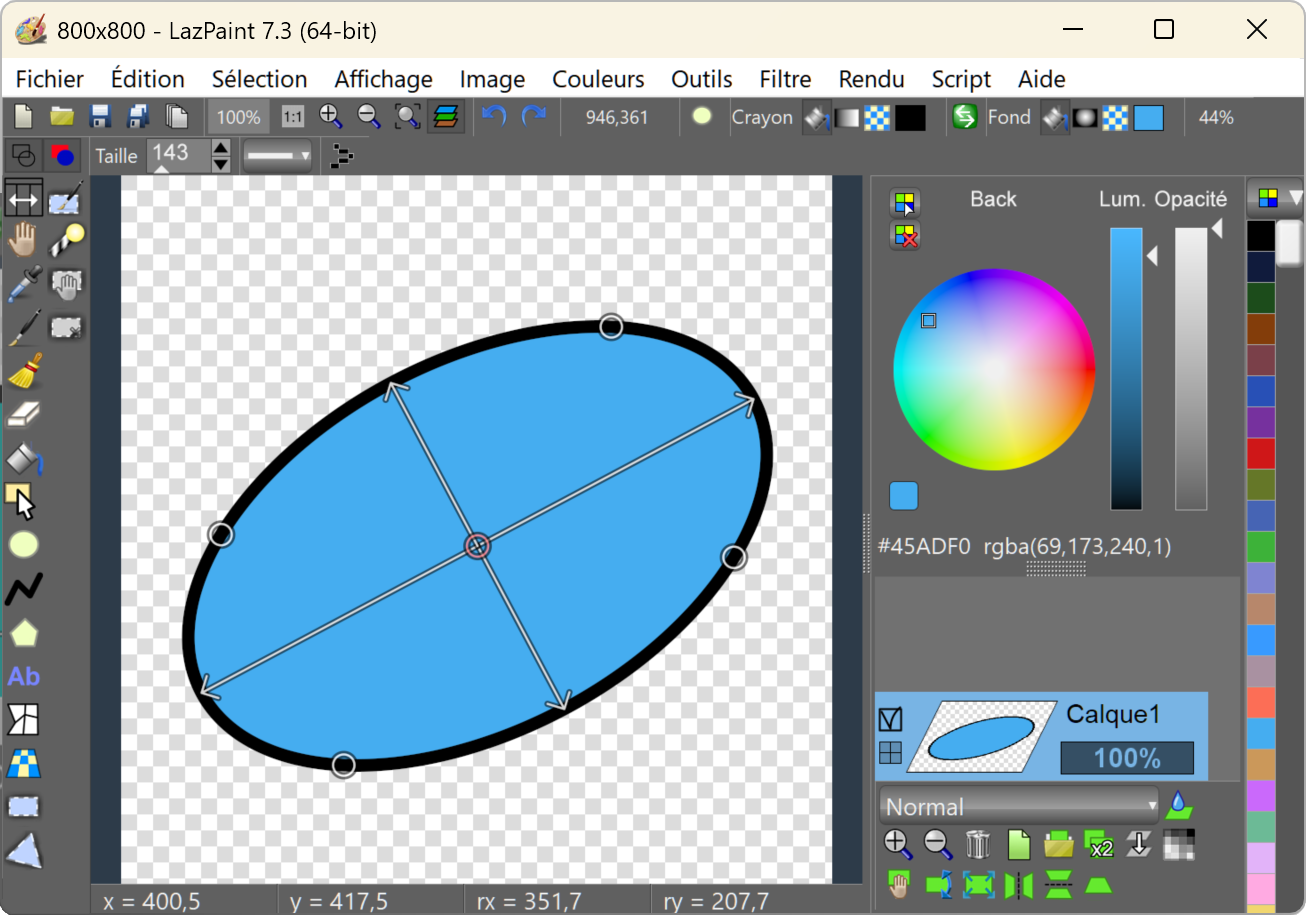
- Shape Tools: LazPaint allows you to draw vector shapes such as rectangles, ellipses, polygons, and curves. These shape tools create a new vector layer or object that remains editable (you can move/resize it later without quality loss). For rectangles and ellipses, simply click-and-drag to draw the shape; hold Shift to constrain to a perfect square or circle. For polygons or poly-lines, click multiple points to create straight segments (Backspace will remove the last point if you make a mistake while drawing). For curves (Bezier-like curves), click the main points and the curve will adapt to it (at a given point, you can set if the curve should be round by pressing S or make an angle by pressing X). To finish a polygon or curve, you can right-click or click the first point again. You can set shape fill to solid color, gradient, or texture, and apply outline strokes or shadows (see Advanced Features for more on vector shapes).
- Text Tool: Allows you to insert text into your image. Click on the canvas to define the area and type to create a text object. You can choose font, size, style, alignment, and color. The text is placed as a vector object, so you can re-edit the content or style by selecting the text shape later. LazPaint also supports special text effects like outline or Phong shading (highlight and inner shadow) through the toolbar. Pressing Esc while using the Text tool can finish editing mode once you’re done typing, while Enter will add a new paragraph, with a vertical margin. Press Shift+Enter to insert a line break, without margin.
- Color Picker (Eyedropper): This tool lets you sample colors from the image. Click (or click-and-hold) on any pixel to pick up its color into the primary color slot (called “Pen” color). In LazPaint, the secondary color (background or “Back” color) can be picked by using the alternate click (for example, right-click with the picker to set the secondary color). This is useful for matching colors already in your image. You can quickly switch to the eyedropper by pressing C.
- Clone Stamp Tool: A handy retouching tool that allows you to copy pixels from one part of the image to another (useful for removing blemishes or duplicating objects). To use it, first right-click on the area you want to copy from (this sets the source point). Then left-click and draw where you want to paint the cloned content. The source moves as you paint, copying from the original area to the new area. If you need to reset the source, right-click again on a new source point. This works across layers too (ensure you have the correct layer selected when setting the source).
- Selection Tools: These tools (detailed in the Selection Tools section) let you select specific regions of the image for editing. LazPaint offers rectangular selection, elliptical selection, free-form lasso, polygon selection, and a magic wand. Once a selection is made, other tools will draw in a temporary selection layer, only affecting that area. Selections can be inverted or adjusted.
- Move Tool: The move tool lets you move the current selection or layer content. After making a selection, choose the selection move tool and drag the selection to reposition that portion of the image. If a whole layer is selected in the Layers panel, the move tool will shift that layer. This tool is essential for arranging elements in a composition.
- Hand Tool (Pan): Represented by a hand icon, it allows you to pan around the canvas without editing. Click and drag with the Hand tool to scroll the view. This is especially helpful when you're zoomed in and want to navigate. You can as well start editing a shape or moving the current layer by clicking on it. You don’t actually need to switch to the Hand tool frequently, because you can hold the Space bar at any time to temporarily toggle the hand mode for panning (release Space to return to the previous tool).
- Zoom Controls: LazPaint provides zoom in/out buttons (magnifying glass icons with +/–). You can also zoom with the mouse wheel. Holding Ctrl will apply a finer zoom. There are one-click buttons for 100% (actual size) and “fit to window” zoom. Zooming does not alter the image data, only your view. The toolbar will show the current zoom level and coordinates of the cursor which can be helpful for precision work.
Most tools have an options toolbar that gets appended at the top when selected, allowing you to adjust settings like opacity, size, tolerance, etc. Be sure to check those context options to get the desired effect from each tool. With a bit of practice, these tools enable both simple drawings and more complex image editing tasks.
Selection Tools
Selection tools allow you to define and work on a specific part of the image. LazPaint supports anti-aliased selections for smooth edges and semiselection, and you can even modify a selection as a mask. The selection content can be edited like an temporary layer. When a portion is semiselected, the content will be drawn with as semiopaque. The main selection tools include:
- Rectangular & Elliptical Selection: Click and drag to select a rectangular or oval region. You can see the selection outline with a bevel while the selection is highlighted in blue. Hold Shift while dragging to constrain the shape to a square or circle. Use this to quickly select large areas, borders or round shapes.
- Polygon Selection: Similar to the lasso but in straight line segments. Click to place corner points one by one; a line will connect each point. Use this for selecting polygonal or irregular shapes with straight edges. If you need to remove the last point while drawing, press Backspace. To finish, either click on the starting point or right-click to close the polygon automatically (closing connects back to the start).
- Curve Selection: This lets you draw a selection similary to Polygon Selection but with Bezier-like curve that adapt to the points.
- Magic Wand: Select an area by color similarity. Click on a pixel and the magic wand will select all neighboring pixels of similar color (the tolerance for similarity can be adjusted in the tool’s options). This is great for selecting a solid-colored background or any region with consistent color without tracing it manually. If the “Progressive” option is on, the border will be antialiased or semiselected.
- Selection Pen: LazPaint also allows treating the selection as a mask that you can paint on. You can paint the selection area (displayed as a translucent overlay). This can be very precise for complex selections. This is an advanced but powerful way to refine selections.
- Edit Selection: A dedicated “selection editor” can be opened with Edit Selection menu item. It shows selection as a grayscale image (white = selected, black = not selected, gray = semiselected).
Once a selection is made, other operations will only affect that selected area. You can also move or transform the selection itself. For instance, choose the Move tool to drag the selected area to a new location. Various transformations are available in the Selection menu. If you intend to adjust the transform, it is recommended to paste it in a new layer and use layer transforms. To cancel current transformation, press Esc. To deselect, press Enter: this “releases” the selection, merging it over current layer.
You can modify an existing selection by adding or subtracting areas. Uniquely, in LazPaint you can also use the right mouse button to subtract from a selection without changing modes. This makes it easy to refine your selection shape. Remember that any filter or paint action will only affect the area within the “selection” outline once you have an active selection.
Layer Support
Like advanced editors, LazPaint fully supports multiple layers in an image. The Layers panel (or window) shows all layers in the current image, each acting like a transparent sheet stacked on others. Using the layer toolbar or the main menu, you can add new layers, duplicate a layer, delete layers, and rearrange them by dragging up or down in the list. Each layer has an checkbox icon to toggle visibility and an opacity percentage slider to adjust its transparency. There’s also a dropdown for blend mode (default is “Normal”). Blend modes allow layers to mix in different ways (like Multiply, Additive, etc.). LazPaint offers several blending modes, including some unique to this program. Using layers, you can draw or edit parts of your image separately without affecting others, enabling non-destructive editing.
LazPaint supports both raster and vector layers in the same image. A raster layer is a normal bitmap layer (pixels), while a vector layer contains shapes or text that can be edited after creation. For example, if you use the Shape or Text tool, LazPaint will keep that object’s vector information on the layer so you can adjust it later (e.g., change the text or reshape the curve). These vector objects are re-rendered if you transform the layer, ensuring they stay sharp. If you then use a pixel-based tool (like the brush) on that layer, LazPaint will rasterize it, meaning it converts the vector shapes into pixels on the layer (at that point you can’t edit the shape’s properties anymore). In practice, LazPaint handles this automatically – just be mindful that once you paint on a vector layer, it becomes a regular raster layer.
Basic layer operations include:
- Rename a layer: Click the layer name in the panel to name it (helpful for organization).
- Reorder: Drag layers in the list to change which one is on top.
- Opacity: Adjust the layer’s transparency (0% = fully transparent, 100% = fully opaque).
- Blend Mode: Set how the layer blends with those below (e.g., “Multiply” for darkening, “Screen” for lightening, etc.). You can click a blend mode button to get a visual selection dialog or choose from a dropdown list.
- New/Delete: Add a layer (it will be blank or you can paste into it) or delete the selected layer.
There are also commands to Flatten the image (merge all layers into one, e.g. when you need to save to formats that don’t support layers) and to Merge down (combine a layer with the one below it). Flattening will discard any hidden layers and just produce a single-layer image. LazPaint’s native .LZP format is recommended for saving your work in progress, as it preserves layers, transparency, and other metadata. You can later export to a standard format (like PNG or JPG) for sharing. Additionally, LazPaint can save to OpenRaster .ORA format, which means you can open your layered image in other software that supports ORA. This is great for interoperability (for example, you could start a painting in LazPaint and then fine-tune it in Krita or GIMP, or vice versa). LazPaint also imports Paint.NET files (.pdn). Overall, layers are one of the most powerful features of LazPaint – use them to separate your work into manageable pieces (sketch, color fills, shading, etc.) which you can edit independently.
Transformations
LazPaint provides various commands and tools to transform your image or layers. Common transformation operations are found under the Image menu or Layer toolbar. For example, you can rotate the entire image 90° clockwise or counter-clockwise, or flip it horizontally/vertically. These operations affect all layers (if it’s the whole image) or just the selected layer (if you use the Layer transform). You can also rotate by arbitrary angles or resize layers via interactive tools.
Scaling/Resizing: To resize the whole image, use Image > Resample and enter new dimensions. LazPaint uses resampling algorithms to preserve quality when shrinking or enlarging images. There is also a Canvas Size function which lets you expand or crop the canvas without scaling the content (for example, to add borders or trim edges). If you want to scale a specific layer or selection, you might use the selection transform tool or copy the selection to a new image, resize, and paste back.
Rotation: For quick 90-degree turns, use the menu commands. For free rotation, LazPaint has a rotation tool – select the layer (or selection), then choose the rotate function. A bounding box appears, allowing you to drag to rotate. Hold Ctrl while rotating to snap to common angles (15° increments). This is useful for precise straightening. Once the desired angle is set, press Enter to apply the rotation (or Esc to cancel). Rotating a vector shape layer will not degrade its quality (it re-renders the shape). Rotating a raster layer multiple times will not cause blurring due to re-sampling, as long as it is not re-rasterized by using the pen tool for example. So try to separate parts for which you intend to adjust transforms continuously.
Moving: The Move tool (as described in Basic Tools) is used to shift layer contents or selections. You can also use arrow keys for nudging the selection or layer by small increments (1px per press, 10px if holding Ctrl, and align to the border if holding Alt). This is handy for fine positioning, such as aligning an object.
Advanced Transform Tools: LazPaint 7 introduced some sophisticated transform tools. The Layer Perspective tool allows you to take a layer and adjust its corner perspective – for instance, to make an image appear as if it’s tilted or receding in 3D space. You’d drag the corners of a grid on the layer to skew it. Another feature is the Deformation Grid (warp) tool, which gives you a mesh over the image that you can drag points on to warp the image smoothly (good for subtle photo corrections or artistic morphs). There is also a Zoom Layer tool that can scale a layer via a handle interface. These tools make LazPaint capable of complex transformations typically found in larger programs.
Keep in mind that you can always Undo (Ctrl+Z) if a transformation doesn’t turn out right. LazPaint supports up to 200 undo steps by default, so you have a lot of freedom to experiment. Use transformations to position and tweak your image elements until you get the desired result.
Color Adjustments
LazPaint offers many color manipulation functions under the Colors menu (sometimes called Adjustments). These allow you to correct or alter the colors of your image or layer. Some key color adjustments include:
- Brightness/Contrast: A basic adjustment to make the image brighter or darker, and to increase or decrease contrast. It’s straightforward: brightness shifts all colors lighter or darker, while contrast expands or compresses the difference between light and dark areas. Shortcut: Shift+Ctrl+T for brightness/contrast as shown in menu.
- Curves: A more advanced tool for tonal adjustment, letting you remap input brightness to output brightness via a curve graph. In LazPaint, you can adjust curves for RGB channels or even HSL channels. This allows very fine control (for example, brighten midtones without blowing out highlights, by dragging the mid section of the curve).
- Colorize: Impose a color tint on the image while preserving the luminosity. You can pick a hue and adjust saturation. For example, turning a grayscale image into a sepia-toned image is a use of colorize. It’s like applying a colored filter over the image.
- Posterize: Reduce the number of distinct colors in the image. You choose a level (e.g., 8 levels will reduce the image to 8 shades per channel, creating a stylized effect). This can give an image a flat, graphic look by limiting color gradients.
- Shift Colors: Rotate the hues of the image and adjust saturation. This is useful if, say, you want to change all blues to reds, etc., or generally alter the color palette of the image. It’s like a hue rotation across the spectrum.
- Intensity and Lightness: These are two different brightness-related adjustments. “Intensity” in LazPaint makes colors lighter or darker without simply mixing with white or black (preserving saturation better). “Lightness” does a similar brightening/darkening but by pushing colors toward white or black. The difference is subtle but important for photo editing. Experiment to see which fits your needs; they target brightness in slightly different ways.
- Normalize: Stretches the color histogram to use the full range of tones. If an image is low-contrast, normalize will boost the darkest value to pure black and the lightest to pure white, spreading out the intermediate values. This can improve contrast automatically, similar to “Auto Contrast” in some software.
- Negative: Inverts the colors of the image – like a film negative. LazPaint offers “Negative” (which applies gamma correction so the inversion looks natural) and “Linear Negative” (inverts without gamma, giving a slightly different effect). This can be used for creative effects or analyzing complementary colors.
- Grayscale: Converts the image to grayscale (removes color). It uses a standard luminance calculation with gamma correction, meaning it tries to preserve perceived brightness. The result is an image with only shades of gray.
- Swap Channels: LazPaint has options (under Filter operations) to swap color channels. For instance, Swap Red/Blue will exchange the red and blue channel values. This can fix images with misinterpreted color channels or create odd color effects. There is as well the Apply function filter that can apply any arbitrary equation on color channels (see Filters and Effects).
Most of these adjustments open a dialog with sliders or curves and a preview. You can preview changes and tweak before applying. LazPaint processes colors in the sRGB color space with gamma awareness, so the adjustments are done in a way that matches how we perceive brightness (this avoids some artifacts that naive adjustments might create). In practice, that means using curves or intensity should feel “correct” visually. If you are working with indexed colors (like a palette-based image), note that some operations might increase the color count.
Aside from these, LazPaint also allows palette editing via a Palette toolbar (e.g., you can load/save color palettes, reduce image to a palette with dithering or posterize effect since version 6.4.1). This is especially useful for pixel art or preparing images for formats with limited colors. You can associate a color with a digit by holding Ctrl and pressing the digit on the keyboard. Then simply recall the color by pressing the digit again (without holding Ctrl).
The Color Window is where you choose colors to draw with – it shows a color wheel, with sliders for luminance/opacity. You can swap the current pen and background color with the small double-arrow icon or reset them to a color by entering their name. LazPaint’s color picker tool and right-click drawing (which uses the secondary color) allow you to utilize both colors efficiently while drawing. In summary, the Colors menu and related tools give you powerful control over the look of your image, from subtle corrections to dramatic changes.
Filters and Effects
The Filter menu in LazPaint contains various filters that you can apply to a layer or selection to change its appearance in creative ways. Filters range from blurs and sharpens to distortions and artistic effects. You can apply a filter to the entire image or just to the current selection (only the selected area will be affected). Below are some categories of filters available:
- Blur Filters: These soften the image or reduce detail. LazPaint includes Radial Blur (a non-directional blur radiating outward, with options like precise, zoom or “corona” blurs), Motion Blur (simulates the streaking of moving objects in one direction), and even a Custom Blur (which uses a mask or kernel you provide to blur in a custom pattern). There are also simpler blurs (fast blur, precise blur) which balance speed vs quality. Use blur filters to smooth out noise or create depth-of-field effects.
- Sharpen and Smooth: Sharpen enhances edges by increasing contrast around them, making the image appear crisper. Smooth (or a basic blur) does the opposite, softening features and blending pixels. These two are complementary – if an image is slightly blurry, a light sharpen can help; if it’s grainy or has harsh edges, a smooth can mellow it out. Be careful not to over-sharpen (which can cause halos) or over-smooth (which loses detail).
- Noise Filters: You can add or reduce noise. The Add Noise filter simply adds random color pixels (sprinkle of grain) to the image – sometimes used for artistic effect or to give a photo a film grain look. The Median filter reduces noise by replacing each pixel with the median color of its neighbors. Median is good for removing salt-and-pepper noise or small artifacts while preserving edges better than a plain blur.
- Artistic/Edge Effects: LazPaint has some unique filters. Contour will create a line drawing by keeping edges on a white background (like a pencil or sketch outline). Emboss will make the image appear raised or imprinted by turning colors into grays and shading edges as highlights and shadows – this gives a 3D relief effect. There’s also ClearType (and its inverse) which mimic the subpixel rendering of text, though that’s a niche effect for specific use cases. Another one is Apply Function, which is an advanced filter where you can apply an arbitrary mathematical function to the image’s color channels (useful only if you know exactly what transformation you need, like custom color curves via formula).
- Distortions: These filters warp the image geometry. Twirl will swirl the image around a chosen center, creating a vortex look. Wave Displacement will distort the image as if ripples or waves are passing through it (configurable by amplitude and frequency). Sphere makes the image look like it’s mapped on a 3D sphere (a bulging effect), and Cylinder does similarly as if wrapped on a cylinder. These can be used for fun-house mirror effects or to prepare textures for 3D mapping.
- Render (Generate): In addition to filters that modify existing content, LazPaint has a Render menu with tools to generate new content or patterns. For example: Perlin Noise (creates a random cloudy noise texture), which can be used for natural textures; Water, Snow, Wood, Metal, Stone, Marble etc. that generate textures of those materials; Clouds which adds cloud-like colored noise; and Rain which draws streaks to simulate falling rain on the image. These are great for creating backgrounds or for special effects (for instance, adding a rain effect over a photo). Some of these generated effects create a new layer that can be updated. Using different layers allow you to overlay them with blending modes for interesting results (e.g., rain on a separate layer set to a lightening blend mode to overlay on a scene).
Filters can dramatically change your image, so it’s wise to use layers (duplicate the layer and apply the filter on the copy, so you can adjust opacity or mask the effect). You can also combine filters for unique outcomes. For example, LazPaint’s documentation or community posts show techniques like creating lightning by using Perlin Noise on two layers and blending them with Difference mode, then colorizing to a blue hue. This kind of layering plus filtering yields effects that a single built-in filter might not achieve alone. Don’t hesitate to experiment – with undo and layers, you can always revert or fine-tune the effect. And remember, filters respect selections: you can isolate the filter to just one part of your image by selecting that area first, which is very useful for targeted edits (like blurring a background but keeping a subject sharp).
Advanced Features
Vector Layers and Shapes: As mentioned earlier, LazPaint supports vector elements. When you draw shapes or text, they can remain vectorial (since version 7). You can use the Edit Shape tool (an icon with a cursor) to click on a vector shape or text and move it or adjust its nodes after it’s been created. This means you can fix a shape’s size or a text’s spelling after doing other work, which is very convenient. LazPaint can also apply gradients or textures to fills of shapes; to do this, look at the shape tool’s options where you can usually choose fill style (solid color vs gradient vs pattern). If you choose gradient, you can specify the start and end colors and drag the gradient line on the shape. Textures allow you to select an image to fill the shape. Furthermore, LazPaint has some alignment tools for shapes (to align vector objects relative to the canvas). Vector layers from LazPaint can be saved in SVG format: LazPaint can export layered SVG files so that vector shapes and text are preserved in the SVG. This means you could open the result in an SVG editor like Inkscape and continue editing there. Conversely, you can import SVG content. The vector capabilities of LazPaint make it a hybrid raster-vector editor, which is somewhat unique for a program of its class.
3D Object Import: LazPaint can import 3D models in Wavefront .obj format. When you use this feature (File > Import 3D Object… or similar), it will open a dialog to load an .obj file. You can choose the orientation, angle and lighting for the 3D model, and then LazPaint will render the 3D object onto a layer as a raster graphic. This is useful if you have a simple 3D model (like text or a shape from a 3D program) that you want to composite into an image. 3D models are loaded with their textures and custom normals, implying it does a decent job bringing in the model’s appearance. Keep in mind that once imported, the object is just pixels on a layer (not a fully manipulable 3D object), so choose your angle and lighting before importing, or import multiple times at different angles if needed.
Python Scripting: For power users, LazPaint provides a scripting interface under the Script menu. The scripts are written in Python. Through scripting, you can automate tasks or add new features. LazPaint comes with some pre-made scripts that implement common layer effects (accessible usually as menu items under Script). For example, you can find scripts for Drop Shadow, Stroke (Outline), Inner Glow, Outer Glow, etc. Using the Drop Shadow script will create a duplicate of your layer’s content, fill it with a semi-transparent black and offset it to look like a shadow – all automatically. The Stroke script will stroke the outside of your opaque pixels with a chosen color. These are things you can do manually with layers, but the scripts make it one-click. You can also create new scripts: if you are comfortable with Python, you can use it to manipulate images, layers, and apply effects in code. For instance, a script can iterate over all layers and apply a filter, or generate a complex procedural image. To run a script, you usually place the .py file in the scripts directory and then it will appear in the Script menu. This feature is somewhat advanced and might require consulting the official documentation or community for specifics, but it’s there for those who need automation or want to extend LazPaint’s capabilities.
Command-Line Usage: Another advanced feature is the ability to use LazPaint from a command-line (terminal) without the GUI, to perform image operations in batch or quick conversions. The general syntax is: lazpaint <input file> [commands...] [output file]. For example, you can use LazPaint to convert image formats just by calling it in a terminal: lazpaint picture.pdn picture.png will load a Paint.NET file and save it as PNG. If you include operation commands, LazPaint will apply them. Commands are given with a prefix - or / (on Windows you can use either, on Linux use -). Some examples: /RotateCW to rotate clockwise 90°, /horizontalflip or /verticalflip to mirror the image, /Resample(800,600) to resize the image to 800x600, /opacity(128) to change opacity, etc. You can chain multiple commands. For instance: lazpaint input.jpg /RotateCCW /BlurFast output.png would rotate an image counter-clockwise and then blur it, saving the result. If you omit the output file, LazPaint will execute the commands and then open the result in the GUI for you to review or continue editing. You can also run LazPaint with no input but with commands to create images from scratch; for example, lazpaint /New(800,600) /Gradient(255,255,255,255,0,0,0,255,Linear,0,0,800,600) gradient.png would create a new 800x600 image and fill it with a black-to-white linear gradient, then save it. Using LazPaint via command-line is like having a lightweight ImageMagick-like tool for basic operations, which can be very useful for scripting repetitive tasks or integrating into other workflows. For the full list of supported, run the command lazpaint -help or refer to the wiki and examples.
Keyboard Shortcuts
LazPaint provides keyboard shortcuts for most commands to speed up your workflow. Many of these are indicated in the menus next to the command names (for example, in the File menu you’ll see Ctrl+O for Open, Ctrl+S for Save, etc.). It follows common conventions: Ctrl+Z for Undo, Ctrl+Y (or Ctrl+Shift+Z) for Redo, Ctrl+C to Copy, Ctrl+V to Paste, Del to delete a selection or layer (when a layer is focused), and so on. In addition to those, here are some useful shortcuts and mouse tricks that may not be immediately obvious from the menus:
- Space bar (Pan): Hold down the space bar to temporarily switch to the Hand tool and pan around. This works while using most other tools – for example, if you’re in the middle of drawing with the brush and need to move to a different part of the image, press and hold space, drag to move the canvas, then release space to return to the brush.
- F6 (Toggle panels): Press F6 to hide or show all the floating tool windows (Toolbox, Layers panel, Color panel, etc.). This is useful if you want a distraction-free canvas or if you accidentally closed a panel and want it back. Pressing F6 again brings them back exactly as they were.
- Ctrl (Precise transforms): When using transformation operations (like rotating or resizing with handles), holding Ctrl will constrain the transform for precision. For rotation, it snaps to fixed angles (15° increments). For moving, it snaps to pixels.
- Shift (Constrain shapes/lines): Hold Shift while drawing shapes to maintain aspect ratio (perfect circle/square). When using the Edit shape tool, Ctrl will add or remove the elements to the current vector selection. When using polygon/curve tools, holding Shift allow to add another polygon that will be linked to the current one. This is useful if you want to draw a hole, for this you need to draw the hole in the reverse direction (counter-clockwise if the polygon was drawn clockwise).
- Backspace (Undo point/text): When drawing a polygon selection or shape with multiple clicks, press Backspace to delete the last point you placed if you made a mistake. Similarly, if you are typing text with the Text tool, Backspace will delete characters as usual. Essentially it’s an undo for the last step in shape/text input.
- Enter (Confirm selection/transform): Press Enter to confirm or “apply” the current action. For example, after moving or transforming a selection, pressing Enter will finalize it (stop the moving mode).
- Esc (Cancel/deselect): Press Esc to cancel the current operation or dialog. If you’re in the middle of drawing a shape or making a selection and want to cancel, Esc will usually abort it. If a selection is active, Esc will clear it (deselect) provided there is no partial action pending (for instance, Esc will deselect if a selection exists and you are not actively moving a node or something).
- Right-click (Alternate actions): The right mouse button is used for alternate tool actions in LazPaint. For drawing tools, right-click will draw with the secondary (background) color instead of the primary, effectively “swapping” the colors temporarily. For selection tools, dragging with right-click will subtract from the existing selection (where left-click would normally add or replace the selection). For polygon shapes and lines, a right-click often signifies “finish” – it closes the shape so you don’t have to loop back to the start manually. In tools like the Clone Stamp, as mentioned, right-click sets the source point. Also, certain effect tools (like setting a light source for shaded text or shapes) use right-click: for example, if you have a “Shaded shape” tool (with a light source), you can right-click on the canvas to set the light’s direction.
- Mouse Wheel: Use Mouse Wheel to zoom in and out (each notch will zoom a step). You can also click the middle mouse button (wheel click) and drag to pan if your mouse supports it.
- Tool Shortcuts: LazPaint has single-key shortcuts to switch tools. For instance, pressing B will select the Brush, E for Eraser, T for Text, etc. These are indicated in the tooltip of the tool or in the menu. Using these single keys can speed up switching between tools without going to the toolbox each time.
By becoming familiar with these shortcuts, you can significantly speed up your editing process in LazPaint. The interface tooltips and status bar messages often remind you of these. If you forget a shortcut, check the menu or this documentation. With practice, you’ll find yourself using a combination of keyboard and mouse to work quickly and efficiently.
FAQ (Frequently Asked Questions)
- Q: How do I install or update LazPaint?
- A: Installation is straightforward. For Windows, run the installer and follow the prompts (it’s a small program and doesn’t bundle unwanted extras). For the portable version, just unzip it to a folder and run
LazPaint.exe. On Ubuntu/Debian Linux, you can download the.debpackage and double-click it to install, or use the command line (withdpkg -icommand). Other Linux users can use Flatpak on Flathub or Snap, or compile from source. On macOS, there is a DMG – open it and drag LazPaint to Applications. To update, you’ll typically download the new version and install it over the old one (settings should carry over). Check the LazPaint blog or GitHub releases for update announcements. - Q: What file formats can LazPaint open and save?
- A: LazPaint supports a wide range of formats:
- Native/project format:
.LZP(LazPaint Project) – preserves layers, transparency, etc. - Layered formats:
.ORA(OpenRaster) for interoperability,.PDN(Paint.NET) for which LazPaint can import all layers,.PSD(Photoshop) which LazPaint can open as flattened, and.oXo. - Standard image formats: PNG, JPEG, BMP, GIF, TIFF, WebP, PCX, TGA, XPM, XWD, etc. – LazPaint can read and write these. Note: For GIF and TIFF, LazPaint can handle multi-frame images (e.g., animations or multi-page TIFFs). ICO/CUR (icons and cursors) are supported too (LazPaint can create multi-resolution icons).
- 3D formats: LazPaint imports Wavefront
.OBJmodels (rasterizing them to an image layer). It does not export 3D, so this is input only.
- Native/project format:
- Q: Does it support transparency (alpha channel)? My eraser isn’t making things transparent.
- A: Yes, LazPaint fully supports transparency on layers. If the eraser isn’t making areas transparent, it could be because there is an underlying opaque background layer. In LazPaint, when you create a new image, you have the option of a solid background or transparent. Alternatively, you can use selections: select the region you want to make transparent and hit Delete.
- Q: I lost my Layers/Colors/Tools windows. They disappeared – how do I get them back?
- A: They might just be hidden or behind the main window. The quickest way to bring all panels back is to press F6, which toggles the visibility of the tool windows. If that doesn’t bring them back, go to the View menu and ensure “Layers Window”, “Colors Window”, “Toolbox” (or similarly named items) are checked or click them to re-open. LazPaint allows floating these panels freely, so it’s possible they got moved off-screen if you had a multi-monitor setup; F6 on/off can reset their state. If you prefer these panels to not float, you can dock them into the main window in the View menu.
- Q: How can I crop the image to a certain area?
- A: Currently, LazPaint doesn’t have a dedicated “Crop Tool” button like some editors, but cropping is easy via selection. Use the rectangular selection tool to select the area you want to keep. Then go to Image > Crop to selection. That will cut the canvas down to that selection. Make sure you have the area exactly selected first. If you want to crop by exact numbers, you could use Canvas Size and manually input the new size, but using the selection is more visual. Once cropped, everything outside the area is discarded. If you accidentally crop too much, just undo (Ctrl+Z) and try again. Pro tip: if you want to extend the canvas (the opposite of crop, to add border area), use Image > Canvas Size and enter a larger size – you’ll get empty space (transparent or filled with a color depending on background) around your image.
- Q: How do I draw a straight line or a perfect circle?
- A: To draw a straight line, the easiest way is to use the Polyline or Curve tool. Click (left or right) the starting point and right-click the end point. For a perfect circle or square, start drawing an ellipse or rectangle and hold Shift while dragging – this locks the aspect ratio to 1:1 (a circle or square).
- Q: The quality of my image got worse after resizing/rotating – can I avoid that?
- A: When you resize or rotate a raster image, some quality loss (blurriness) can happen due to interpolation of pixels. LazPaint uses resampling algorithms to minimize this, but multiple transformations can compound errors. To avoid quality loss: try to do scaling in one go to the final size (rather than repeated rescale down then down again). For rotation, 90° rotations are lossless (since pixels realign), but arbitrary angles will blur slightly. One strategy: if you have vector shapes or a source with higher resolution, use those. LazPaint’s vector layers, for instance, can be transformed without losing quality, so if you know you’ll need to rotate a shape, keep it vector until you finalize. Also, LazPaint’s undo allows you to experiment – if you rotated something and it looks bad, undo and try a different approach (maybe rotate before scaling, or vice versa). In summary, the algorithms are good but not magic; avoid successive transforms on the same pixels. If needed, go back to the original and do a single transform to target. And for critical photo work, use the highest quality resample option.
- Q: Are there any tutorials or documentation for learning LazPaint?
- A: Yes, beyond this help page, there are several resources. There’s also an official forum where the developer and users discuss usage tips – you can search or ask questions there. The LazPaint blog introduces new features with examples (for instance, posts about using blending modes to create lightning, or new gradient tools). Additionally, there are a few video tutorials on YouTube that demonstrate LazPaint’s interface and basic drawing operations (search for “LazPaint tutorial” on YouTube). Since LazPaint shares some similarities with Paint.NET, tutorials for that program can sometimes be applied in LazPaint (for example, how layers and blend modes work, or basic photo editing steps). And of course, you can reach out via the project’s GitHub page if you encounter bugs or have suggestions. The community is small but friendly, and the developer is active in responding to feedback.
Further Resources
If you need more information or help, check out these official LazPaint resources:
- Tips and assets - A PDF with lots of tips and links to assets provided by Love (a community member)
- LazPaint Forum – Community forum (under Lazarus forums) where you can ask questions, report issues, and share experiences with other LazPaint users and the developer.
- LazPaint GitHub Repository – The source code and issue tracker. Useful if you want to report a bug or request a feature, or even contribute code.
- YouTube: LazPaint Tutorials and Demos – A YouTube search link, since specific video content may be user-contributed. Here you can find tutorials or demonstrations of LazPaint in action.
- LazPaint Official Blog – Posts by the developer highlighting new features and tips (for example, explanations of new version changes).
- LazPaint Wiki – Comprehensive documentation on features, file format specs, tutorials, and troubleshooting.
With this help guide and the resources above, you should be well on your way to mastering LazPaint. It’s a versatile tool that bridges simple painting and advanced editing. Happy painting!